Classic and Interactive Report Header Check Box
-------------------
<input type="checkbox" id="checkAll" > Check All
function and Global Variable Declaration
---------------------
$('#checkAll').click(function () {
$('input:checkbox').prop('checked', this.checked);
});
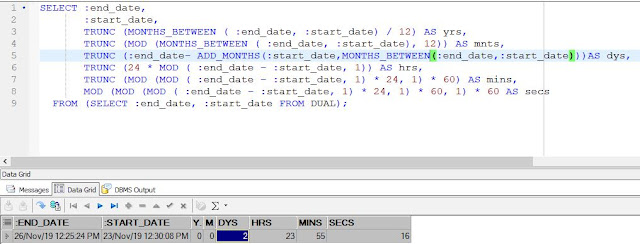
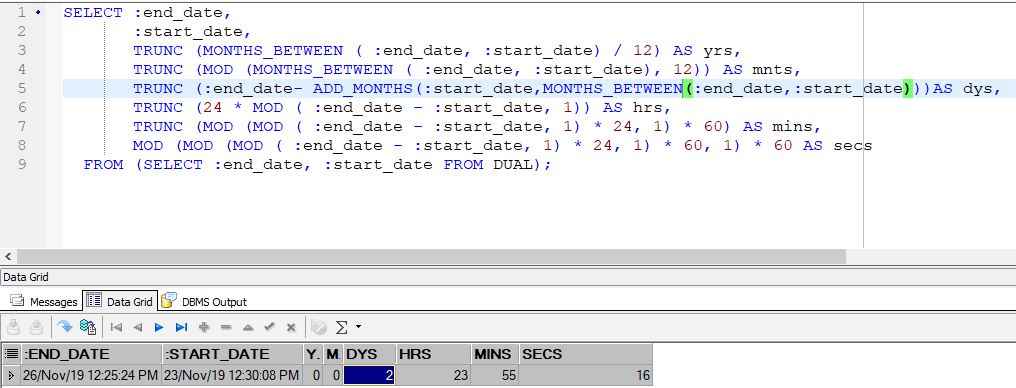
Wednesday, December 11, 2019
Monday, November 25, 2019
Day, Minute, Second Difference Between Two Date
SELECT :end_date,
:start_date,
TRUNC (MONTHS_BETWEEN ( :end_date, :start_date) / 12) AS yrs,
TRUNC (MOD (MONTHS_BETWEEN ( :end_date, :start_date), 12)) AS mnts,
TRUNC (:end_date- ADD_MONTHS(:start_date,MONTHS_BETWEEN(:end_date,:start_date)))AS dys,
TRUNC (24 * MOD ( :end_date - :start_date, 1)) AS hrs,
TRUNC (MOD (MOD ( :end_date - :start_date, 1) * 24, 1) * 60) AS mins,
MOD (MOD (MOD ( :end_date - :start_date, 1) * 24, 1) * 60, 1) * 60 AS secs
FROM (SELECT :end_date, :start_date FROM DUAL);
Wednesday, November 20, 2019
Remove Special Character From A String Using REGEXP_REPLACE
SELECT REGEXP_REPLACE('test'dssdf/sdfs','[^a-z_A-Z ]') FROM DUAL
RESULT : testdssdfsdfs
RESULT : testdssdfsdfs
Tuesday, September 17, 2019
How to add Captcha In Your Login Page in Oracle Apex
Step 1
Create a item in your login page.
Step 2
Copy below code into item "Post Text"
<div style="background-color:#FFF; border:1px solid #ececec; padding:3px;">
<img width="25" height="25",=""
src="APEX_050100.wwv_flow_image_generator.get_image?p_position=1&p_sessionid=&APP_SESSION."><img
width="25" height="25",=""
src="APEX_050100.wwv_flow_image_generator.get_image?p_position=2&p_sessionid=&APP_SESSION."><img
width="25" height="25",=""
src="APEX_050100.wwv_flow_image_generator.get_image?p_position=3&p_sessionid=&APP_SESSION."><img
width="25" height="25",=""
src="APEX_050100.wwv_flow_image_generator.get_image?p_position=4&p_sessionid=&APP_SESSION."><img
width="25" height="25",=""
src="APEX_050100.wwv_flow_image_generator.get_image?p_position=5&p_sessionid=&APP_SESSION.">
</div>
Step 3
Create a process and copy the code into your process and select when process execute button.
DECLARE
vCount NUMBER := 0;
BEGIN
IF TRIM (:P101_CAPTCHA) IS NULL
THEN
RAISE_APPLICATION_ERROR (-20001,
'Please Confirm Verification Code.');
END IF;
BEGIN
SELECT 1
INTO vCount
FROM APEX_050100.wwv_flow_request_verifications
WHERE SESSION_ID = :APP_SESSION
AND SUBSTR (VERIFICATION_STRING, 1, 5) = :P101_CAPTCHA;
EXCEPTION
WHEN OTHERS
THEN
RAISE_APPLICATION_ERROR (-20001,
'Please Confirm Verification Code.');
END;
IF vCount = 1
THEN
NULL;
ELSE
RAISE_APPLICATION_ERROR (-20001,
'Please Confirm Verification Code.');
END IF;
END;
Step 4
Error Message
#SQLERRM_TEXT#
Sunday, September 8, 2019
Json to text Parsing with List ( [ ] ) in Oracle PL/SQL
DECLARE
j apex_json.t_values;
BEGIN
apex_json.parse(j, '{ "items": [ 1, 2, { "foo": "qaium" } ] }');
dbms_output.put_line('found items[3].foo--'||apex_json.get_varchar2(p_path => 'items[%d].foo', p0 => 3, p_values => j));
END;
j apex_json.t_values;
BEGIN
apex_json.parse(j, '{ "items": [ 1, 2, { "foo": "qaium" } ] }');
dbms_output.put_line('found items[3].foo--'||apex_json.get_varchar2(p_path => 'items[%d].foo', p0 => 3, p_values => j));
END;
Wednesday, September 4, 2019
Get Workspace ID
To import a single page at APEX application, we need workspace id. The id can be detected by the following query.
SELECT WORKSPACE, TO_CHAR (WORKSPACE_ID)
FROM APEX_WORKSPACES;
OR
SELECT APPLICATION_ID, WORKSPACE, TO_CHAR (WORKSPACE_ID)
FROM APEX_APPLICATIONS;
Saturday, August 31, 2019
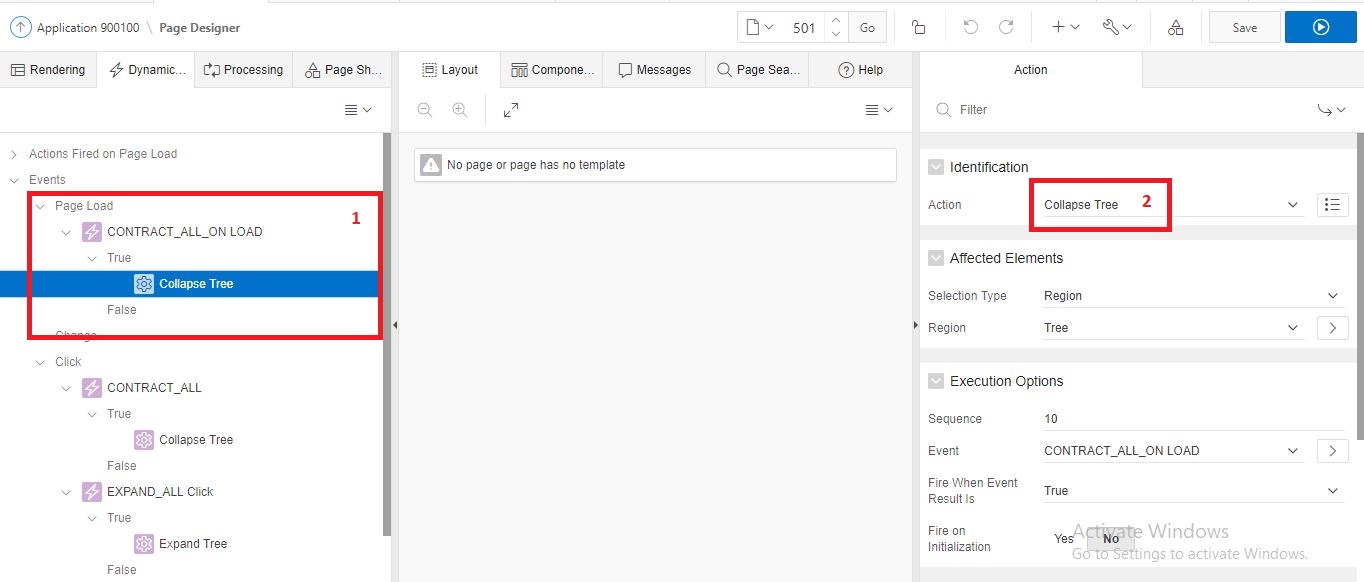
Oracle Apex Tree Collapse OR Expand Automatically
Follow the image steps for collapse on page load.
Step 1. Create a Dynamic action on Page Load.
Step 2. Select Expand or Collapse Tree.
If you want to expand on page load then just in step 2 select Expand Tree
(Click on the Image for clear view)
Remove Extra Space From A String By Oracle SQL / PLSQL
SELECT REGEXP_REPLACE ('Remove Extra Space', '[[:blank:]]+', ' ') FROM DUAL
Tuesday, August 27, 2019
Json Parsing by Select Statement in Oracle
DECLARE
l_cursor SYS_REFCURSOR;
BEGIN
OPEN l_cursor FOR
SELECT e.empno AS "employee_number",
e.ename AS "employee_name",
e.deptno AS "department_number"
FROM emp e ;
-- WHERE rownum <= 2;
APEX_JSON.initialize_clob_output;
APEX_JSON.open_object;
APEX_JSON.write('employees', l_cursor);
APEX_JSON.close_object;
DBMS_OUTPUT.put_line(APEX_JSON.get_clob_output);
APEX_JSON.free_output;
END;
Output:
{
"employees":[
{
"employee_number":7839
,"employee_name":"KING"
,"department_number":10
}
,{
"employee_number":7698
,"employee_name":"BLAKE"
,"department_number":30
}
]
}
Sunday, August 4, 2019
Check Digit eAN13
<html>
<body>
<h2>JavaScript Class</h2>
<p>Check Digit eAN13</p>
<input type="text" id="eAN13" onchange="eanCheckDigit(this.value);">
<p id="demo"></p>
<script>
function eanCheckDigit(s){
var result = 0;
for (counter = s.length-1; counter >=0; counter--){
result = result + parseInt(s.charAt(counter)) * (1+(2*(counter % 2)));
}
document.getElementById("demo").innerHTML = (10 - (result % 10)) % 10;
}
</script>
</body>
</html>
// Credit goes to FAHIM JAMAL VAI
Friday, August 2, 2019
Multiple File Select And Upload In A Time By Oracle Apex
1. Create File Browse Item
2. Goto Item >Advanced> Custom Attributes> Type Multiple (For selecting multiple data)
3. Create another text field to get File Name
4. Create Dynamic Action on File Browse Item
"Onchange" event JavaScript.
var x = document.getElementById("P30_DOCUMENTS");
vlength=x.files.length;
var txt = "";
$x("P30_FILE_NAME").value="";
if ('files' in x) {
for (var i = 0; i <vlength; i++) {
if (x.files.length == 0) {
txt = "Select one or more files.";
$x("P30_FILE_NAME").value="";
}
else{
txt += "<br><strong>" + (i+1) + ". file</strong><br>";
console.log("txt ="+txt );
var file = x.files[i];
if ('name' in file) {
txt += "name: " + file.name + "<br>";
$x("P30_FILE_NAME").value+=file.name;
}
if ('size' in file) {
txt += "size: " + file.size + " bytes <br>";
}
if(i!=vlength-1)
{
$x("P30_FILE_NAME").value+=",";
}
}
}
}
5. Create the Page Process to get the file from APEX_APPLICATION_FILES and Store it in a Temporary Table.
Code:
DECLARE
l_selected apex_application_global.vc_arr2;
lv_filename VARCHAR2 (100);
BEGIN
l_selected := apex_util.string_to_table (:p37_filename, ':');
FOR i IN 1 .. l_selected.COUNT
LOOP
lv_filename := l_selected (i);
BEGIN
INSERT INTO mul_file_attach
(file_id, filename, mime_type, file_content,file_size)
SELECT ID, lv_filename, mime_type, blob_content,DOC_SIZE
FROM apex_application_files
WHERE filename = lv_filename AND created_by = :app_user;
COMMIT;
EXCEPTION
WHEN OTHERS
THEN
raise_application_error (-20585, 'Error in Insertion' || SQLERRM);
END;
DELETE FROM apex_application_files
WHERE filename = lv_filename AND created_by = :app_user;
COMMIT;
END LOOP;
END;
Monday, July 22, 2019
Uncommon Functions and Objects In Oracle SQL and PL/SQL
1. TO_CHAR(Date,'fmDay Month fmDD, YYYY'): 'fm' prefix can be remove Embedded spaces from value.
2. NVL2( value , value_if_not_null, value_if_null )
3. In NVL and NVL2
NVL2(inv_date,'Pending','Incomplete')
=> True (value_if_not_null and value_if_null are same type)
NVL2(inv_amt,inv_date,'Not Available') False
NVL2(inv_date,sysdate-inv_date,sysdate)
=> True (value_if_not_null and value_if_null are same type)
NVL2(inv_amt,inv_amt*.25,'Not Available') False
NVL(ADD_MONTHS(END_DATE,1),SYSDATE)
=> True (value and value_if_null are same type )
TO_DATE(NVL(SYSDATE-END_DATE,SYSDATE)) False
NVL(MONTHS_BETWEEN(start_date,end_date),'Ongoing') False
NVL(TO_CHAR(MONTHS_BETWEEN(start_date,end_date)),'Ongoing')
=> True (value_if_null is convert to value_if_null type)
NVL(TO_CHAR(cust_credit_limit*.15),'Not Available')
=> True (value_if_null is convert to value_if_null type)
TO_CHAR(NVL(cust_credit_limit*.15,'Not Available')) False
NVL(cust_credit_limit*.15,'Not Available') False
NVL(cust_credit_limit,'Not Available') False
4. NULLIF
If both value is same then return null or retrun first value.
SELECT NULLIF(1, 1) FROM emp; Return : null
SELECT NULLIF(1, 2) FROM emp; Return : 1
SELECT NULLIF(null, 2) FROM emp; Return : null
5. COALESCE
COALESCE (value1, value2, value3) is equal to
CASE
WHEN value1 is NOT NULL THEN value1
WHEN value2 is NOT NULL THEN value2
Else value3
END
1. TO_CHAR(Date,'fmDay Month fmDD, YYYY'): 'fm' prefix can be remove Embedded spaces from value.
2. NVL2( value , value_if_not_null, value_if_null )
3. In NVL and NVL2
NVL2(inv_date,'Pending','Incomplete') True (value_if_not_null and value_if_null are same type)
NVL2(inv_amt,inv_date,'Not Available') False
NVL2(inv_date,sysdate-inv_date,sysdate) True (value_if_not_null and value_if_null are same type)
NVL2(inv_amt,inv_amt*.25,'Not Available') False
NVL(ADD_MONTHS(END_DATE,1),SYSDATE) True (value and value_if_null are same type )
TO_DATE(NVL(SYSDATE-END_DATE,SYSDATE)) False
NVL(MONTHS_BETWEEN(start_date,end_date),'Ongoing') False
NVL(TO_CHAR(MONTHS_BETWEEN(start_date,end_date)),'Ongoing') True (value_if_null is convert to value_if_null type)
NVL(TO_CHAR(cust_credit_limit*.15),'Not Available') True (value_if_null is convert to value_if_null type)
TO_CHAR(NVL(cust_credit_limit*.15,'Not Available')) False
NVL(cust_credit_limit*.15,'Not Available') False
NVL(cust_credit_limit,'Not Available') False
4. NULLIF
If both value is same then return null or retrun first value.
SELECT NULLIF(1, 1) FROM emp; Return : null
SELECT NULLIF(1, 2) FROM emp; Return : 1
SELECT NULLIF(null, 2) FROM emp; Return : null
5. COALESCE
COALESCE (value1, value2, value3) is equal to
CASE
WHEN value1 is NOT NULL THEN value1
WHEN value2 is NOT NULL THEN value2
Else value3
END
2. NVL2( value , value_if_not_null, value_if_null )
3. In NVL and NVL2
NVL2(inv_date,'Pending','Incomplete')
=> True (value_if_not_null and value_if_null are same type)
NVL2(inv_amt,inv_date,'Not Available') False
NVL2(inv_date,sysdate-inv_date,sysdate)
=> True (value_if_not_null and value_if_null are same type)
NVL2(inv_amt,inv_amt*.25,'Not Available') False
NVL(ADD_MONTHS(END_DATE,1),SYSDATE)
=> True (value and value_if_null are same type )
TO_DATE(NVL(SYSDATE-END_DATE,SYSDATE)) False
NVL(MONTHS_BETWEEN(start_date,end_date),'Ongoing') False
NVL(TO_CHAR(MONTHS_BETWEEN(start_date,end_date)),'Ongoing')
=> True (value_if_null is convert to value_if_null type)
NVL(TO_CHAR(cust_credit_limit*.15),'Not Available')
=> True (value_if_null is convert to value_if_null type)
TO_CHAR(NVL(cust_credit_limit*.15,'Not Available')) False
NVL(cust_credit_limit*.15,'Not Available') False
NVL(cust_credit_limit,'Not Available') False
4. NULLIF
If both value is same then return null or retrun first value.
SELECT NULLIF(1, 1) FROM emp; Return : null
SELECT NULLIF(1, 2) FROM emp; Return : 1
SELECT NULLIF(null, 2) FROM emp; Return : null
5. COALESCE
COALESCE (value1, value2, value3) is equal to
CASE
WHEN value1 is NOT NULL THEN value1
WHEN value2 is NOT NULL THEN value2
Else value3
END
Friday, July 19, 2019
Strong Authentication
( "USER_ID" NUMBER,
"USER_NAME" VARCHAR2(100),
"PASSWORD" VARCHAR2(4000),
"CREATED_ON" DATE,
"DEPARTMENT" VARCHAR2(200),
"AUT_SECTION" VARCHAR2(200),
"EXPIRES_ON" DATE,
"ADMIN_USER" CHAR(1),
"FACTORY_NAME" VARCHAR2(200),
"ACCESSCODE" NUMBER(20,0),
"ACTIVE" CHAR(2),
"PHOTO" BLOB,
"SCHOOL_NAME" VARCHAR2(200)
)
==================================
CREATE OR REPLACE TRIGGER "USER_T1" BEFORE INSERT OR UPDATE ON OTSL_USERS FOR EACH ROW
BEGIN
:NEW.PASSWORD:=CUSTOM_HASH(UPPER(:NEW.USER_NAME),:NEW.PASSWORD);
if inserting then
IF :NEW.USER_ID IS NULL THEN
SELECT NVL(MAX(USER_ID)+1,1) INTO :NEW.USER_ID FROM OTSL_USERS;
END if;
end if;
END;
/
ALTER TRIGGER "USER_T1" ENABLE
/
==========================================
create or replace function custom_hash (p_username in varchar2, p_password in varchar2)
return varchar2
is
l_password varchar2(4000);
l_salt varchar2(4000) := 'UYUKQULATJYQ2RJTWPTHHIU7K1O7FR';
begin
-- This function should be wrapped, as the hash algorhythm is exposed here.
-- You can change the value of l_salt or the method of which to call the
-- DBMS_OBFUSCATOIN toolkit, but you much reset all of your passwords
-- if you choose to do this.
l_password := utl_raw.cast_to_raw(dbms_obfuscation_toolkit.md5
(input_string => p_password || substr(l_salt,10,13) || p_username ||
substr(l_salt, 4,10)));
return l_password;
end;
=========================================
create or replace function custom_auth (p_username in VARCHAR2, p_password in VARCHAR2)
return BOOLEAN
is
l_password varchar2(4000);
l_stored_password varchar2(4000);
l_expires_on date;
t NUMBER;
l_count number;
begin
t:=0;
select count(*) into l_count from otsl_users where user_name = p_username;
if l_count > 0 and t=0 then
select password, expires_on into l_stored_password, l_expires_on
from otsl_users where user_name = p_username;
if l_expires_on > sysdate or l_expires_on is null then
l_password := custom_hash(p_username, p_password);
if l_password = l_stored_password then
return true;
else
return false;
end if;
else
return false;
end if;
else
return false;
end if;
end;
Sunday, July 7, 2019
Know Details About SQLERRM Function
This function retrieves the detailed SQLERRM of the last exception raised.
Know Details About SQLERRM Function
This function retrieves the detailed SQLERRM of the last exception raised.
Syntax
UTL_HTTP.get_detailed_sqlerrm
RETURN VARCHAR2;
EXAMPLE:
-----------------------
1. EXECUTE THE BELOW ANONYMOUS BLOCK
DECLARE
l_request UTL_HTTP.req;
BEGIN
l_request := UTL_HTTP.begin_request ('http://www.some_company.com');
END;
2. NOW RUN THE BELOW SQL COMMAND
select utl_http.get_detailed_sqlerrm from dual
Value Assign On Application Item From Backend in Oracle Apex
Wednesday, June 19, 2019
Export Oracle Apex Application From Database
If you want to export your apex application from database not from application, you can execute the below command
"SELECT APEX_050100.WWV_FLOW_EXPORT_API.GET_APPLICATION (your application id) d FROM DUAL"
some times your application server is not working but your DB server is ok and you need to export your application right now, then you need this function to export your application.
N.B
-------
this function work on 5.1.4 or later version
Wednesday, May 29, 2019
Install Oracle Apex 19.1 on Oracle 11g
KEEP THE PATH FROM OTHER TABLESPACE.
Step-1 CREATE TABLESPACE APEX DATAFILE 'D:\APP\JEWEL\ORADATA\ORCL\MFIMIS\APEX.DBF' SIZE 10M AUTOEXTEND ON NEXT 20M;
Step-2 @APEXINS.SQL APEX1 APEX1 TEMP /i/
Step-3 @APXCHPWD.SQL
Step-4 @APXLDIMG E:\apex_19.1 (This path is apex folder's immediate previous directory )
Step-5 @apex_epg_config.sql E:\apex_19.1 (This path is apex folder's immediate previous directory )
Step-6 EXEC DBMS_XDB.SETHTTPPORT(8888) ;
Step-7 ALTER USER ANONYMOUS ACCOUNT UNLOCK ;
ALTER USER APEX_PUBLIC_USER ACCOUNT UNLOCK;
ALTER USER APEX_PUBLIC_USER IDENTIFIED BY vinish;
Monday, May 27, 2019
Calling JS by ID
$("td[headers=myimgid]").click(function(){ // myimgid is a ID
(I use it for Image Size)
ShowLargeImage(this);
});
<title>
<span style="font-family: "courier new" , "courier" , monospace;">$("td[headers=myimgid]").click(function(){ </span> // myimgid is a ID<br />
(I use it for Image Size)<br />
<span style="font-family: "courier new" , "courier" , monospace;"> ShowLargeImage(this);</span><br />
<span style="font-family: "courier new" , "courier" , monospace;"> </span><br />
<span style="font-family: "courier new" , "courier" , monospace;">});</span>
Sunday, May 26, 2019
Multi Table Update In One Update Query
UPDATE (SELECT B.CHECK_V AS OLD, B.CHECK_V AS NEW
FROM MAS A INNER JOIN DTL B ON A.ID = B.SECTION_ID
WHERE A.DOCNUMBR = :P6_DOC AND B.ROWID = :ROWID_X) T
SET T.NEW = :CHECK_V;
<title>
<span style="font-family: "courier new" , "courier" , monospace;">UPDATE (SELECT B.CHECK_V AS OLD, B.CHECK_V AS NEW</span><br />
<span style="font-family: "courier new" , "courier" , monospace;"> FROM MAS A INNER JOIN DTL B ON A.ID = B.SECTION_ID</span><br />
<span style="font-family: "courier new" , "courier" , monospace;"> WHERE A.DOCNUMBR = :P6_DOC AND B.ROWID = :ROWID_X) T</span><br />
<span style="font-family: "courier new" , "courier" , monospace;"> SET T.NEW = :CHECK_V;</span>
Example Code Of MERGE Insert/ Update
1. First create a interactive report on a table. Like
select
STD_ID,
STD_NAME,
ROLL_NO ,
CLASS_NAME
from
STUDENT_REG
WHERE SECTION = :P57_SECTION
AND UPPER(SCHOOL) = UPPER(:P0_SCHOOL_NAME)
2. Create a text field item like “P57_VAR”
3. Create a Dynamic Action on Event “Select Change
Interactive Grid” and select respective selection type and region name.
4. Action >
Execute JavaScript >
var i, selectedIds=":" ,
model =
this.data.model;
for ( i = 0; i < this.data.selectedRecords.length; i++ )
{
if (i>=0) {
selectedIds +=
model.getValue( this.data.selectedRecords[i], "STD_ID") +
":"; }
// ”STD_ID” is the
unique key of the report
else
{
selectedIds +=
model.getValue( this.data.selectedRecords[i], "STD_ID");
}
}
$s("P57_VAR", selectedIds);
// "P57_VAR" is a item to preserve unique key to
get another report data.
apex.region("report").refresh();
// “report” is second report STATIC ID
5. Create report on same table with same condition. like
select
APEX_ITEM.display_and_save (03,STD_ID) STD_ID ,
STD_NAME,
ROLL_NO ,
CLASS_NAME,
--APEX_ITEM.CHECKBOX(02,'CHECKED','N') ATT_FLAG,
APEX_ITEM.CHECKBOX(01,'#ROWNUM#','CHECKED') "Check"
from
STUDENT_REG
where
instr(:P57_VAR, ':' ||STD_ID|| ':' ) > 0
Now it may work…
Maybe I can’t express the full cycle so try to understand
your-self.
Thank You.
Thank You.
Tuesday, May 21, 2019
Button in Report Manually in Oracle Apex
NAME,
'<input style="background-color: #85bbe7; color: black; font-weight: bold;" type="button" value="Upload">'Attachment,
SCHOOL
FROM
TEST_TABLE;
Run Time Validation Or Validation From Dynamic Action By JavaScript in Oracle Apex
function myerror(){
var myval = apex.item('P6_ERR').getValue();//document.getElementById('P6_ERR').value;
apex.message.clearErrors();
apex.message.showErrors(
[
{
"type": "error",
"location": "page",
"message": myval
}]
);
}
STEP-2: CALL THE FUNCTION ON ONCHANGE EVENT ON YOUR SPECIFIC ITEM ON CUSTOM ATTRIBUTE
onchange="myerror();"
STEP-3: CREATE A DYNAMIC ACTION ON CLICK OR AS YOU WISH PASTHE BELOW SAMPLE CODE
EVENT: CLICK
ACTION: EXECUTE PL/SQL CODE
BEGIN
IF LENGTH(:P6_NEW)>=10 THEN
:P6_ERR :='Length must not exceed 10 digit....';
--RAISE_APPLICATION_ERROR(-20001,'Length must not exceed 4 digit....');
elsif LENGTH(:P6_NEW)>=5 THEN
:P6_ERR :='Length must not exceed 4 digit....';
end if;
exception
when others then
:P6_ERR :=SQLERRM;
--RAISE_APPLICATION_ERROR(-20001,'Length must not exceed 4 digit');
END;
Thursday, May 16, 2019
Work With apex_collection in Oracle Apex
(Collection Name Must be in Capital letter)
apex_collection.create_collection('NAME');
2. Existence Check:
apex_collection.collection_exists ('NAME');
3. Add Member:
apex_collection.add_member (p_collection_name => 'NAME',
p_c001 => :P2_ITEM1,
p_c002 => :P2_ITEM2,
p_c003 => :P2_ITEM3);
4. Collection to Database table data transcfer:
BEGIN
FOR i IN ( SELECT c001 AS a, c002 AS b, c003 AS c
FROM apex_collections
WHERE collection_name = 'NAME'
ORDER BY 1)
LOOP
INSERT INTO DATABASE_TABLE (COLUMN1, COLUMN2, COLUMN3)
VALUES (i.a, i.b, i.c);
END LOOP;
COMMIT;
END;
5. Truncate Collection:
apex_collection.truncate_collection(p_collection_name => 'NAME');
6. Delete Collection Member :
apex_collection.delete_member(
p_collection_name => collection name,
p_seq => member sequence number);
7. Delete All Collecion Members:
apex_collection.delete_members(
p_collection_name => collection name,
p_attr_number => number of attribute used to match for the specified
attribute value for deletion,
p_attr_value => attribute value of the member attribute used to match for deletion);
8. Delete Collection :
apex_collection.delete_collection (
p_collection_name =>'NAME');
Friday, May 10, 2019
Re Assign Oracle Table Column Without Delete Data From Table Using (Rebuild form TOAD)
-- **********************************************************************
-- Note: This rebuild script is not meant to be used when a possibility *
-- exists that someone might try to access the table while it is *
-- being rebuilt! If you need online table rebuilding and you *
-- are on Oracle 10g or newer, use the dbms_redfinition wizard *
-- under database -> optimize. (Requires DB Admin module) *
-- *
-- Locks are released when the first DDL, COMMIT or ROLLBACK is *
-- performed, so adding a "Lock table" command at the top of this *
-- script will not prevent others from accessing the table for *
-- the duration of the script. *
-- *
-- One more important note: *
-- This script will cause the catalog in replicated environments *
-- to become out of sync. *
-- **********************************************************************
-- Table Rebuild script generated by Toad
--
-- Original table: TEST1
-- Backup of table: TEST1_X
-- Date: 11/05/2019 12:48:57
Saturday, May 4, 2019
String Moving
Region Type Static Content
String Moving
<font style="font-size: 20px;" color=#009688><marquee> Moving String tag !!! :)</marquee></font>
<title>
<div class="separator" style="clear: both; text-align: center;">
<a href="https://4.bp.blogspot.com/-q0OR5teN3wg/XM2-uXNYHCI/AAAAAAAAE6Q/rPdhey_P4BcBX_48L_BS11r9vsse6U21QCLcBGAs/s1600/movingtag.gif" imageanchor="1" style="margin-left: 1em; margin-right: 1em;"><img border="0" data-original-height="244" data-original-width="1340" height="115" src="https://4.bp.blogspot.com/-q0OR5teN3wg/XM2-uXNYHCI/AAAAAAAAE6Q/rPdhey_P4BcBX_48L_BS11r9vsse6U21QCLcBGAs/s640/movingtag.gif" width="640" /></a></div>
<br />
<u>Region Type Static Content </u><br />
<br />
<font style="font-size: 20px;" color=#009688><marquee> Moving String tag !!! :)</marquee></font>
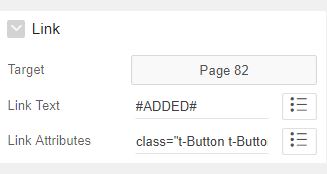
How to open region as modal and pass a value from report or item.
1. Create report and take a column as link.
2. Create another region for modal and put a static ld like ‘m’
3. Then Link -> Target -> URL type and wright the code like this one.
Here P1_ID is the item where you want to assign the value and #ID# is report value.
And ‘m’ is the static id of modal region and this region template should be Inline Dialog .
javascript:$s('P1_ID','#ID#','#ID#'); javascript:openModal('m');
Monday, April 22, 2019
Report Button CSS
1. class="t-Button t-Button--hot"
2. class="add t-Button t-Button--warning t-Button--simple t-Button--stretch"
3. class="t-Button--small t-Button--simple t-Button--hot t-Button--stretch"

Sunday, April 21, 2019
Apex Report Header Image Size (CSS)
Here imgid is static id of apex header.
td[headers="imgid"] img{
width: 50px;
height: 50px;
}
Saturday, March 30, 2019
Bangla Writing in Oracle Database.
To Support Bangla Writing in Oracle Database. Please do the steps.
SQL> conn /as sysdba
Connected.
SQL> SHUTDOWN IMMEDIATE;
SQL> STARTUP RESTRICT;
SQL> ALTER SYSTEM SET JOB_QUEUE_PROCESSES=0;
System altered.
SQL> ALTER SYSTEM SET AQ_TM_PROCESSES=0;
System altered.
SQL> ALTER DATABASE CHARACTER SET AL32UTF8;
SQL> SHUTDOWN IMMEDIATE;
SQL> STARTUP;
Thank You
SQL> conn /as sysdba
Connected.
SQL> SHUTDOWN IMMEDIATE;
SQL> STARTUP RESTRICT;
SQL> ALTER SYSTEM SET JOB_QUEUE_PROCESSES=0;
System altered.
SQL> ALTER SYSTEM SET AQ_TM_PROCESSES=0;
System altered.
SQL> ALTER DATABASE CHARACTER SET AL32UTF8;
SQL> SHUTDOWN IMMEDIATE;
SQL> STARTUP;
Thank You
Wednesday, March 20, 2019
For Single Application .. Multiple Schema
You Can Use API
--Shared Component
---Security Attribute
-----Database Session
-------Initialization PL/SQL Code
DECLARE
BEGIN
IF UPPER(:APP_USER) = 'A' THEN
APEX_UTIL.SET_PARSING_SCHEMA_FOR_REQUEST
( P_SCHEMA => 'HR_A');
ELSE
APEX_UTIL.SET_PARSING_SCHEMA_FOR_REQUEST
( P_SCHEMA => 'HR_B');
END IF;
END;
Get Before @ Portion From a Email Address
SELECT SUBSTR( :EMAIL, 0, INSTR(:EMAIL,'@')-1) DY_USER_NAME
FROM DUAL ;
FROM DUAL ;
Sunday, February 24, 2019
Group Report In Oracle Apex
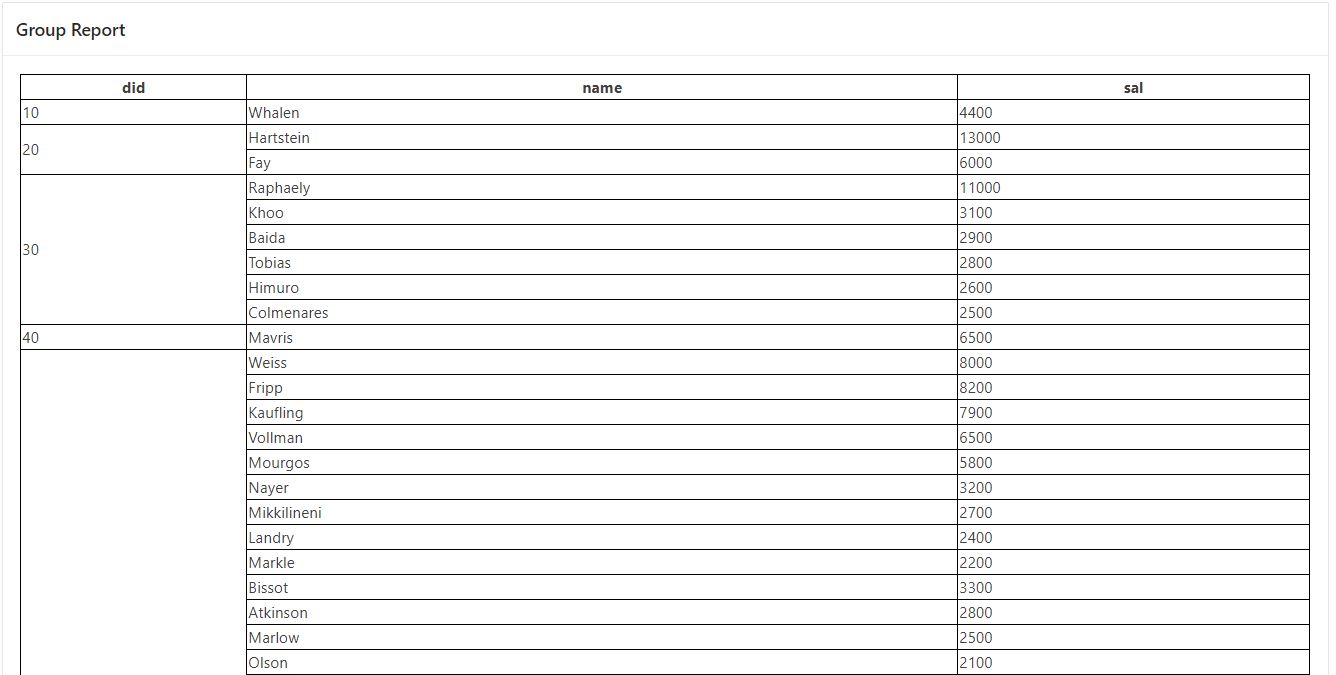
Just Create A Region with PL/SQL Dynamic Content Type.
Then copy-pest the code.
This report is just a demo. Do your report yourself. Just you can take the concept .
declare
v_did varchar2(50) :=1000;
v_cnt number;
v_rowspan number;
begin
htp.p('<style>
tr,th,td{
border: 1px solid black;
}
table{
width: 100%;
}
</style>');
htp.p('<table><tr><th>did</th><th>name</th><th>sal</th></tr>');
for i in (select department_id did, department_name dname from departments where department_id in (select department_id from employees) order by 1 asc) loop
select count(*) into v_cnt from employees where department_id=i.did;
v_rowspan :=v_cnt+1;
htp.p('<tr><td rowspan="'||v_rowspan||'">'||i.did||'</td></tr>');
for a in (select last_name lname, salary sal from employees where department_id =i.did) loop
if v_did<> i.did then
htp.p('<tr><td>'||a.lname||'</td><td>'||a.sal||'</td></tr>');
end if;
end loop;
v_did :=i.did;
end loop;
htp.p('</table>');
end;
--Thank You
Tuesday, February 12, 2019
Instant Search in Oracle Apex by Java Script

1. Create a classic report by your query
2. Take a item for input search content
3. Goto Shared Components >> Templates >>Copy Report (Type)/Standard (Name) with diffrent name like Standard2
4. Goto Standard2 >> After Column Heading >> </thead> <tbody id="id" > and save
5. Goto Report Attributes >> Appearance >>Template >> Standard2
6. Copy the code into Page >> Execute when Page Loads
(Change item name and id)
$(document).ready(function(){
$("#P9_SEARCH").on("keyup", function() {
var value = $(this).val().toLowerCase();
$("#id tr").filter(function() {
$(this).toggle($(this).text().toLowerCase().indexOf(value) > -1)
});
});
});
Then Enjoy
Tuesday, January 29, 2019
Redirect To Another Page by Java Script

// Goto new location with a new tab
window.open('https://qaiumer.blogspot.com', '_blank');
// Sets the new location of the current window.
window.location = "https://qaiumer.blogspot.com";
// Sets the new href (URL) for the current window.
window.location.href = "https://qaiumer.blogspot.com";
// Assigns a new URL to the current window.
window.location.assign("https://qaiumer.blogspot.com");
// Replaces the location of the current window with the new one.
window.location.replace("https://qaiumer.blogspot.com");
// Sets the location of the current window itself.
self.location = "https://qaiumer.blogspot.com";
// Sets the location of the topmost window of the current window.
top.location = "https://qaiumer.blogspot.com";
Tuesday, January 22, 2019
Oracle Apex URL Descriptions
http://apex.oracle.com/pls/apex/f?p=AppId
:PageId :Session :Request :Debug :ClearCache :Params :ParamValues
:PrinterFriendly
§
http:// – the protocol, can be http or https
§
apex.oracle.com – your domain/host/server, whatever you
want to call it. Can also be localhost.
§
/pls – indicates that you are using Oracle
HTTP Server with mod_plsql. If you are using APEX Listener or Embedded PL/SQL
Gateway this part is obsolete/missing.
§
/apex – the entry from your dads.conf file
(this a file on your application-server or EPG where the target database is
configured) – in case of EPG its just one entry pointing to localhost, in case
of an OAS you can have multiple entries, each pointing to an other database
§
/f?p= – procedure “f” is called and parameter
“p” is set to the complete rest of the string. Remember: APEX uses mod_plsql.
“f” is a public procedure, this is the main entrypoint for APEX. Or you could
say: “f” is APEX.
§
AppId – the number or the Alias of the Application
§
:PageId – the number or the Alias of the Page
§
:Session – unique Session ID, can be 0 for Public Pages or empty (then
APEX creates a new Session)
§
:Request – a Request Keyword. This is basically
free text, just a string you can specify to react in a process or region
condition on. e.g. you could pass the keyword “CREATE” and have a condition on
the delete button of your page saying “dont’t display this button if request is
CREATE”.
In other words: use the REQUEST to control the behaviour of your page.
When pressing a button, the button sets the REQUEST to the button-value (e.g. SAVE), so that you can control the processes in the page processing (Submit) phase.
In other words: use the REQUEST to control the behaviour of your page.
When pressing a button, the button sets the REQUEST to the button-value (e.g. SAVE), so that you can control the processes in the page processing (Submit) phase.
§
:Debug – set to YES (uppercase!) switches on
the Debug-Mode which renders debug-messages and timestamps in your Browser
window. This helps to detect wrong behaviour of your page or performance issues
and everything else. Every other value then YES turns the Debug-Mode off
§
:ClearCache – you can put a page id or a list of
page ids here (comma-separated) to clear the cache for these pages (set session
state to null, …). But there is more: RP resets the pagination of reports on
the page(s), a collection name deletes the collection, APP clears all pages and
application-items, SESSION does the same as APP but for all applications the
session-id has been used in.
§
:Parameters – comma seperated list of page-item
names. Good practice is to set only those page-items which are on the page you
are going to. Accepts page-items as well as application-items.
§
:ParamValues – comma separated list of values. Each
value is assigned to the corresponding Parameter provided in ParamNameList
(first value assigned to first parameter, second value assigned to second
parameter, and so on…).
The trick here is not having values which contain either a comma “,” or a colon “:”. Both would lead to side-effects and errors, as APEX gets confused when parsing the URL. Using a comma works, if enclosed by slashes: e.g. \123,89\.
The trick here is not having values which contain either a comma “,” or a colon “:”. Both would lead to side-effects and errors, as APEX gets confused when parsing the URL. Using a comma works, if enclosed by slashes: e.g. \123,89\.
§
:PrinterFriendly – set to YES (uppercase!) switches the
page into PrinterFriendly-Mode, uses the Printerfriendly template to render the
Page. You can also hide regions or other elements in PrinterFriendly-Mode using
the PRINTER_FRIENDLY variable in a condition.
Download PDF
Download PDF
Subscribe to:
Posts (Atom)
Restrict File Upload by File Type in Oracle Apex
If you want to restrict file upload by file type/extension/format you can follow the below steps. Goto File Browser Item --> Advanced --...
.png)
-
Search by keyword from Oracle Database Objects. select owner, type, name, line, text from dba_source where 1 = 1 and text like '%TEXT Y...
-
We Can Export Application Components individually from Oracle Apex. Application > Shared Components > Export Application Compo...
